Configuration / Options
Let's take a look before at the DJ-Catalog2 component configuration. Click the Options button which is located on the top-right toolbar and you will see the popup window:
General Settings
Theme settings
- Theme – choose component's theme. To start creating your own theme, create /components/com_djcatalog2/themes/YOUR_THEME/ folder and copy css folder from /components/com_djcatalog2/themes/default/ to YOUR_THEME folder. It is not required to copy js folder nor any other files from default folder, unless you will be making changes in the component's JavaScript. From now, you can alter the CSS code within your own theme.
Do not remove or modify the default folder!
- Use Theme CSS – when disabled, no CSS files from any (selected nor default) theme will be included. Useful if you wich to style the component on your own, within your Joomla! template. It will also prevent responsive CSS files from being loaded
- Responsive support – it will add CSS media queries for mobile devices
- Include Bootstrap CSS – disable this option if your template or website has its own CSS Bootstrap implementation. Otherwise this option might have to be enabled and Joomla! core CSS will be used.
- Include Bootstrap JS – disable this option if your template or website has its own Bootstrap framework implementation. Otherwise this option will have to be enabled and Joomla! core framework will be used.
- Include jQuery UI – by default this option has to be enabled, because some of component scripts require jQuery UI scripts which are not provided by Joomla!. However, if you use another 3rd party jQuery UI library and there won't be any issue, you may try disabling this option.
- Date time format - Formatting of full date-time values
- Date format - Formatting of dates only
- "Latest" label days - Maximum number of days since creation date a product should be tagged with "latest" label
Cache settings
- Cached pages – select types of pages which you wish to be cached.
Joomla! Cache needs to be enabled!
File upload
- Image formats – comma-separated list of allowed image extensions
- Attachment formats – comma-separated list of allowed attachment extensions
- Valid file captions – leave empty to allow any caption or put each caption into separate line to make restriction
- Attachment groups – you can create pre-defined groups for attachments (each name in new line) in order to segregate files based on their group
- Max. attachments – enter the maximum number of files which users should be allowed to upload. Set negative (e.g. -1) to allow uploading unlimited number of files in the back-end.
- Multiple image upload – enable multiple image upload
- Mulitple attachment upload – enable multiple attachments upload
- Images import patch – enter relative path of a directory to which you wish to upload files before they are imported. Format: /lorem/ipsum
- Attachments import patch – enter relative path of a directory to which you wish to upload files before they are imported. Format: /lorem/ipsum
Contact form settings
- Contact form – contact form allows guest to ask question about particular product
- Contact form recipients – enter new-line separated list of email addresses to which contact message should be delivered
- Use user's email as sender – Warning! Enabling this option may result in not delivering emails or treating them as SPAM. Most servers will reject mails when supplied sender doesn't match the real email account from which message is being sent. If this option is disabled, global email address from Joomla! configuration will be used.
- Captcha – captcha settings for users that are not logged-in
- Company name – choose whether field should be hidden, required or optional
- Street – choose whether field should be hidden, required or optional
- City – choose whether field should be hidden, required or optional
- Post code – choose whether field should be hidden, required or optional
- Country – choose whether field should be hidden, required or optional
- State – choose whether field should be hidden, required or optional
- Phone – choose whether field should be hidden, required or optional
- Agreement information – adds required checkbox field that ensures that user submitting the form agrees to process his data.
- Data protection agreement – adds required checkbox field that ensures that user submitting the form agrees to process his data.
- Send a copy – checkbox that wllows user to receive a copy of the message that is being sent
Currency / price settings
- Price for registered – choose 'yes' if you want to display prices for logged-in users only
- Price unit – enter a price currency unit
- Thousand separator – choose between white space, comma, apostrophe or none
- Decimal separator – choose between comma, period or none
- Decimal points – select a number of decimal points
- Unit side – chooses Left or Right side to display a price currency unit
- Prices include tax – this setting indicate whether all prices stored in database should be treated as they already contain tax or not
- Displayed price – choose which price should be displayed
- Show tax – select yes if you want to display tax amount next to the price
- Default client type – newly created users and users that haven't been assigned to any type will be assigned this value
Map settings
- Google Maps API Key (Browser) – enter your google maps api key for browser
- Google Maps API Key (Server) – enter your google maps api key for server
- Initial address – default address which the map will be focused on
- Map type – select which type of map do you want to use
- Zoom – default map zoom
- Map width – enter valid CSS value, e.g. 100% or 400px
- Map height – enter valid CSS value, e.g. 100% or 400px
- Category filter – enables category filtering in Map view
- Producer filter – enables producer filtering in Map view
- Location search – allows to search products by address within given radius
- Link to Google Maps – displays a link within each marker that will direct users to Google Maps page
Social sharing & commenting
- Social buttons code – paste your own code that displays social/share buttons etc.
- Social buttons position – choose where your custom code should appear
- Social code pages – choose on which pages should the social buttons code appear
- Comments – choose comments system
- Import Facebook SDK – it is required by Facebook Comments if ther are enabled. Disable this if your website imports Facebook API in some other way
- DISQUS name – Enter your websitre's DISQUS shortname (without .discqus.com)
- Footer – choose Yes or No to display a link to design-joomla.eu add-ons
Category
Category layout settings
- Catalog Mode – turning on this option will result in displaying only the products assigned to the currently browsed category. If you set to No, component will retrieve products from all sub-categories
- Page heading override – select yes if you want to override Page Heading (menu item settings) with either custom heading or the name
- Category name – show or hide category name
- Category information – show or hide category information
- Category images – choose if category images should be visible within categry description
- Category order – this global setting allows to select wheter categories should always be sorted by their name or 'ordering' attribute. Ths setting affects category filter, subcategories and categories module
Sub-categories
Sub-categories layout settings
- Sub-Categories – select show if you want to display sub-categories
- Sub-Categories Header – show or hide a sub-category header
- Columns – enter a number of columns to display sub-categories
- Description – show or hide a sub-category description
- Truncate description – turning on this option will remove all html tags from the description
- Description length – enter a number limit of a sub-category description characters, leave 0 to display all characters. Remember to choose Yes for the Truncate description option to see the effect
- Sub-category image – choose between showing the image in the slimbox or as a category link. You can disable displaying image
- Read more – show or hide a read more link
- Show children – displays child categories of each sub-category
Product list
Items layout general settings
- Products per page – enter a number of products per page
- List layout – select a layout of products list
- Layout changer – allows visitors to switch between grid/table layouts
- Columns – enter a number of columns to display products
- Default order – choose the default way of products ordering
- Default order direction – choose the default direction of products ordering
- Category ordering priority – when default product order is set to 'ordering' you can select if products should be first sorted by category's ordering or not
- Zero results information – display notification when there aren't any products matching user search criteria
Product filtering
- Show archived – choose if archived products will be displayed
- Display restricted – the setting allows to display product details in the listing view and in the modules, while single product pages will be restricted according to ACL settings. When enabled, guests will be promped do log-in, otherwise 403 error page will be presented
- Only with images – choose yes if you want to enable products filtering only with images
- Featured only – choose Yes if you want to display featured products only
- Featured first – choose Yes if you want to display featured products first
- Category filter – show or hide a category search filter
- Category filter type – select how category filter should work - All Categories: displays all published categories, Active branch: displays all categories in the current branch, starting from top-level parent category, Direct parent branch: displays immediate parent category and all its children.
- Producer filter – show or hide a producer search filter
- Price filter – min/max price filter
- Search filter – show or hide a search filter
- Pictures filter – show or hide a pictures filter
- Search jump/scroll – scrolls the page down to products list when user uses search or filters
- Searchable fields – select which attributes should be compared during text search
- Location search – allows to search products by address within given radius
- Country / State filter – displays either filtering by country, state or both
- A-Z filter – display A-Z (alpha index) filter
- Alphabet letters – comma-separated list of letters in the alphabet that you wish to display in alphabetical filter. Leave empty to use default list
- A-Z: Check letters availability – when enabled, the component will check the database if there are any products starting with each letter. This feature needs lot of server resources, so lease disable it, if you have many products in your database or the website becomes unresponsive.
- Category ordering – show or hide sorting by category
- Producer ordering – show or hide sorting by producer
- Name ordering – show or hide sorting by name
- Price ordering – show or hide sorting by price
- Create date ordering – show or hide sorting by creation date
- Modify date ordering – ordering products by modification date
Product layout
- Product name – choose how product's name should be displayed
- Category name – display a category name as link, as text or hide
- Producer name – display a producer name as link to producer lightbox, as text, as link to producer description or hide
- Producer's products – display a link to list of products next to producer's name
- Price – show price always, only if>0 (if the price is higher than 0) or hide
- Old price – choose if you want to display old price if a product has special price defined
- Show SKU – display SKU of the product, if available
- Author – allows to display name of the author or link to its products
- Hits – number of how many times product page has been displayed
- Created date – product's creation date
- Publish date – product's publishing date
- Extra attributes – show or hide extra attributes (extra fields)
- Cart button – displays 'Add to cart' button when Cart is enabled and product is available
- Description – show or hide a product description
- Truncate description – turning on this option will remove all html tags from the description
- Description length – enter a number limit of description characters, leave 0 to display all characters. Remember to choose Yes for the Truncate description option to see the effect
- Product image – choose between showing the image in the slimbox or as a product link. You can disable displaying image
- Second image – select if you want to display the second image as hover effect
- Readmore – show or hide a read more link
- Preview link – displays a button that opens pop-up window with product preview
Location settings
- Location details – displays location details (address) in Product view
- Combine location fields – TABLE VIEW ONLY! All fields that refer to location can be either displayed each in separate columns or in single one (combined)
- Country – displays country details
- City – displays city details
- Address – displays address details
- Postcode – displays postcode details
- Phone no. – displays phone no. details
- FAX no. – displays FAX no. details
- Website address – displays address of the website
- Email address – displays email address details
RSS settings
- Use RSS Feed – toggles RSS Feeds
- Use RSS Icon – display RSS icon in the category page
- Product limit – limits the number of products in the feed
- Default Order – choose the way products are ordered be default
- Default Order Direction – choose the default direction of products ordering
- Description type – decide whether to use intro or full description in the feed or none.
- Image – use product's image in RSS feed
- Readmore – display readmore
Product page
Single product page layout settings
- Page heading override – select if you want to override Page Heading (menu item settings) with either custom heading or the name
- Product images – choose if product images should be visible within the description
- Category name – display a category name as link, as text or hide
- Producer name – display a producer name as link to producer lightbox, as text, as link to producer description or hide
- Producer's products – display a link to list of products next to producer's name
- Price – show price always, only if>0 (if the price is higher than 0) or hide
- Old price – choose if you want to display old price if a product has special price defined
- Show SKU – display SKU of the product, if available
- Author – allows to display name of the author or link to its products
- Hits – number of how many times product page has been displayed
- Created date – product's creation date
- Publish date – product's publishing date
- Show labels – choose whether you wish to display product labels
- Group attributes – when a product is assigned to multiple groups of extra fields, this setting allows to either display attributes in single table or separate tables – including group names
- Cart button – displays 'Add to cart' button when Cart is enabled and product is available
- Intro description – displays intro description before the full description
- Navigation – display next/prev links
- Print button – link to printable version of product page
- Attachments – display list of attachments that can be downloaded
- File information – display file information below each attachment
Related items
- Related products' column – enter the number of columns in which related products will be displayed
- No. of related products – enter the number of related items that will be displayed in single item view
- Featured first – select yes if you want to display first featured related product
- Default order – choose the way products are ordered by default
- Default order Direction – choose the default direction of products ordering
- Category ordering priority – when default product order is set to 'ordering' so you can select if products should be first sorted by category's ordering or not
Variants settings
- Display variants – you can choose to hide the variants (child products)
- Image – choose if product images should be visible within the description
- Price – show price
- Show SKU – display SKU of the product, if available
- Description – display product description
- Truncate description – turning on this option will remove all html tags from the description
- Description length – enter a number limit of description characters, leave 0 to display all characters. Remember to choose Yes for the Truncate description option to see the effect
- Cart button – displays 'Add to cart' button when Cart is enabled and product is available
- Extra attributes– show or hide extra attributes (extra fileds)
Location settings
- Location details – displays location details (address) in product view
- Country – show or hide country
- City – show or hide city
- Address – show or hide address
- Postcode – show or hide postcode
- Phone no. – show or hide phone no.
- Mobile phone no. – show or hide mobile no.
- FAX no. – show or hide FAX no.
- Website address – show or hide website
- Email address – show or hide email
Map settings
- Map – displays Google Map in Product view
- Map width – enter valid CSS value, e.g. 100% or 400px
- Map height – enter valid CSS value, e.g. 100% or 400px
- Map type – select which type of map do you want to use
- Zoom – default map zoom
- Marker icon – select your marker icon
Compare page
- Enable product compare – select if you want to enable product comparing
- Limit – select the limit of product comparing
Product layout
- Product name – choose how product's name should be displayed
- Category name – displaying category name
- Producer name – displaying producer name
- Producer's products – display a link to list of products next to producer's name
- Price – show price
- Old price – choose if you want to display old price if a product has special price defined
- Show SKU – display SKU of the product, if available
- Author – allows to display name of the author or link to its products
- Hits – number of how many times product page has been displayed
- Created date – product's creation date
- Publish date – product's publishing date
- Cart button – displays 'Add to cart' button when Cart is enabled and a product is available
- Description – display product description
- Truncate description – NOTICE!: turning on this option will remove all HTML tags from description
- Description length – product description character limit
- Product Image – choose between showing the image in the slimbox or as a product link. You can also disable displaying image
- Second image – select if you want to display the second image as hover effect
- Readmore – display readmore button
Location settings
- Location details – displays location details (address) in Product view
- Country – displays country
- City – displays city
- Address – displays address
- Postcode – displays postcode
- Phone no. – displays phone no.
- Mobile phone no. – displays mobile phone no.
- FAX no. – displays FAX no.
- Website address – displays website address
- Email address – displays email address
Producers list
List of producers layout settings
- Producers per page – number of producers per page
- Columns – number of columns
- Default Order – choose the way producers are ordered by default
- Default Order Direction – choose the default direction of producers ordering
- Producer name – display producer name
- Description – display producer description
- Truncate description – NOTICE!: turning on this option will remove all HTML tags from description
- Description length – product description character limit
- Image – setting regarding producer's image behavior
- Readmore – display readmore
Cart
General cart settings
- Show prices – display prices in the cart
- Show VAT – choose if you wish to display VAT tax for every product on Cart and Checkout pages
- Show SKU – display SKU of the product, if available
- Currency – 3-letter currency code according to ISO 4217 standard
- Use Cookies – this option will store user's cart contents in a cookie so that they could be restored when user reopens the browser
- Cookie time – set expiration time for the cookie
- Company logo – select an image that should appear on invoices and in e-mail notifications
- Invoice no. format – E.g. {no}/{month}/{year}
{no} - first available number in given year
{year} - number of the year
{month} - number of the month
{day} - number of the day
- Invoice heading – enter your company details that will be printed on invoices. HTML is allowed
- E-mail header – enter heading text that will be displayed in notification e-mails. HTML is allowed
- E-mail footer – enter your company details that will be displayed in notification e-mails. HTML is allowed
- ToS URL – link to your Terms of Service page
- Privacy policy agreement – displays required checkbox field with the information regarding privacy policy
- Agreement information – enter the agreement information of privacy policy
- Data protection agreement – displays required checkbox field with the information regarding data protection
- Agreement information – enter the agreement information of data protection
Shopping cart settings
- Enabled – allow your guests to purchase products from the cart
- Registered only – select if only registered users should be able to purchase products
- Skip login page – when guest user makes an order he can go directly to checkout page or before that be OPTIONALLY prompted to login
- Enable coupons – select if you want to enable coupons in shopping cart
- Display stock information – select if you want to display information about stock in the shopping cart
- Captcha – captcha settings for users that are not logged-in
- Company field – decide if the field should be hidden, required or optional
- Position – decide if the field should be hidden, required or optional
- Address – decide if the field should be hidden, required or optional
- City – decide if the field should be hidden, required or optional
- Postcode – decide if the field should be hidden, required or optional
- Country – decide if the field should be hidden, required or optional
- State – decide if the field should be hidden, required or optional
- VAT ID – decide if the field should be hidden, required or optional
- Phone – decide if the field should be hidden, required or optional
- Fax – decide if the field should be hidden, required or optional
- Website – decide if the field should be hidden, required or optional
- Message – decide if the field should be hidden, required or optional
Query cart settings
- Enabled – allows guests to ask questions regarding products that have been added to cart
- Registered only – if only registered users should be able to send querries
- Notify owners – when enabled, not only the administrator, but also owners of particular products will receive notifications about queries that refer to their products.
- Captcha – captcha settings for users that are not logged-in
- First name – decide if the field should be hidden, required or optional
- Last name – decide if the field should be hidden, required or optional
- Company field – decide if the field should be hidden, required or optional
- Position – decide if the field should be hidden, required or optional
- Address – decide if the field should be hidden, required or optional
- City – decide if the field should be hidden, required or optional
- Postcode – decide if the field should be hidden, required or optional
- Country – decide if the field should be hidden, required or optional
- State – decide if the field should be hidden, required or optional
- VAT ID – decide if the field should be hidden, required or optional
- Phone – decide if the field should be hidden, required or optional
- Fax – decide if the field should be hidden, required or optional
- Website – decide if the field should be hidden, required or optional
- Message – decide if the field should be hidden, required or optional
Image Processing
Global settings
- Default image – allows you to select default/dummy image for products which do not have any image assigned.
- Resize – select a method of image processing
- Resize original – decide whether you wish to force original images to be resized to max. 2880x2880.
- JPG Quality – enter the number from 1 to 100. Default is 85
- Gallery type:
- Switch – clicking small thumbnails loads their larger version above
- Large and small – first image is large, the other is smaller. Clicking each opens it in the pop-up window
- Small only – there are small thumbnails only. Clicking each opens it in pop-up window
- Popup Image – select if popup image must be optimized or original
- Cropping area (horizontal) – select which part of original image should be cropped
- Cropping area (vertical) – select which part of original image should be cropped
- Large image width/height – enter the dimensions (in pixels) of the large image that is usually the main image of the item/category/producer in the single item/category/producer view
- Medium image width/height – enter the dimensions (in pixels) of the medium image that is displayed in the sub-categories and products lists
- Small image width/height – enter the dimensions (in pixels) of the small image. Small images are the thumbnails used in the FrontPage module, single item, single category, single producer and the category items table view/layout.
TIP! How to calculate the small image width:
Ws = (Wl - S * (TC - 1)) / TC
Where:
- Ws - small image width
- Wl - large image width
- TC - number of small images you want to display below large image
- S - space between small images = (2 * padding) + horizontal spacing
- Image spacing vertical/horizontal – the size of the vertical/horizontal space between images in the single item, single category and single producer view
- Image padding – the size of the image padding
Watermark settings
- Use watermarks – allows to apply watermark onto product images
- Watermark image – select the watermark image
- Watermark size – watermark size (% of image width)
- Watermark position (horizontal) – select the position
- Watermark position (vertical) – select the position
DJ-MediaTools (DJ-MT) Integration
- DJ-MediaTools (DJ-MT) Integration – you may use DJ-MediaTools Album to present images, instead of default style of image presentation. DJ-MediaTools component and DJ-MediaTools Content plugin are required
- DJ-MT Album - Product – select the album that you wish to use to present your images. Only Albums source of 'DJ-Catalog2 Product Gallery' can be used
- DJ-MT Album - Category – select the album that you wish to use to present your images. Only Albums source of 'DJ-Catalog2 Product Gallery' can be used
- DJ-MT Album - Producer – select the album that you wish to use to present your images. Only Albums source of 'DJ-Catalog2 Product Gallery' can be used
- DJ-MT Minimum count – enter the minimum number of images that should trigger DJ-MediaTools integration
Category image settings (optional - leave empty to apply global settings)
- Default image – select the default image
- Resize – select the method of processing images
- Large image width – large images dimensions (in pixels). Large image is usually the first image of item/category/producer in single item/category description/single producer views
- Large image height – large images dimensions (in pixels). Large image is usually the first image of item/category/producer in single item/category description/single producer views
- Medium image width – Medium image dimensions (in pixels). Medium images are displayed in sub-categories and items lists
- Medium image height – Medium image dimensions (in pixels). Medium images are displayed in sub-categories and items lists
- Small image width – Small image dimensions (in pixels). Small images are the thumbnails used in Frontpage module, single item, category description, single producer and items' table views/layouts
- Small image height – Small image dimensions (in pixels). Small images are the thumbnails used in Frontpage module, single item, category description, single producer and items' table views/layouts
- Image spacing vertical – enter the value in [px]
- Image spacing horizontal – enter the value in [px]
- Image padding – enter the value of image padding in [px]
- Use watermarks – allows to apply watermark onto product images
Producer image settings (optional - leave empty to apply global settings)
- Default image – select the default image
- Resize – select the method of processing images
- Large image width – large images dimensions (in pixels). Large image is usually the first image of item/category/producer in single item/category description/single producer views
- Large image height – large images dimensions (in pixels). Large image is usually the first image of item/category/producer in single item/category description/single producer views
- Medium image width – Medium image dimensions (in pixels). Medium images are displayed in sub-categories and items lists
- Medium image height – Medium image dimensions (in pixels). Medium images are displayed in sub-categories and items lists
- Small image width – Small image dimensions (in pixels). Small images are the thumbnails used in Frontpage module, single item, category description, single producer and items' table views/layouts
- Small image height – Small image dimensions (in pixels). Small images are the thumbnails used in Frontpage module, single item, category description, single producer and items' table views/layouts
- Image spacing vertical – enter the value in [px]
- Image spacing horizontal – enter the value in [px]
- Image padding – enter the value of image padding in [px]
- Use watermarks – allows to apply watermark onto product images
SEO Settings
Search Engine Friendly URLs settings
- Category view alias – default value is 'items'. All aliases have to be unique
- Product view alias – default value is 'item'. All aliases have to be unique
- Skip product page – will turn URLs like this: example.com/products/item/1-product into: example.com/products/1-product
- Producer view alias – default value is 'producer'. All aliases have to be unique
- Producers view alias – default value is 'producers'. All aliases have to be unique
- My Products view alias – default value is 'myitems'. All aliases have to be unique
- Item Form view alias – default value is 'itemform'. All aliases have to be unique
- Cart view alias – default value is 'cart'. All aliases have to be unique
- Query view alias – default value is 'query'
- Orders view alias – default value is 'orders'. All aliases have to be unique
- Order view alias – default value is 'order'. All aliases have to be unique
- Checkout view alias – default value is 'checkout'. All aliases have to be unique
- Questions history alias – default value is 'questions'
- Single Question alias – default value is 'question'
- Alias separator – default: 'dash[-]'. A symbol that should separate ID from Alias, example 21,my-product or my-product-21
- ID position – default: 'before'. Decide if the ID should appear before or after alias
- SEO Menus – select menu types which will be explicitly used while creating URLs. All non-selected menus will be skipped. Remember to update this setting after adding new Joomla menus and use this option only if you really have to! By default this setting should be empty.
- SEO Menu items – select individual menu items which will be used while creating URLs. This setting may overrde the previous one. Don't forget to include menu items for static pages such as Cart, User products, etc. Otherwise they will be skipped too. By default this setting should be empty.
- Follow style/template ID-s – This option is useful when you use different template styles assigned to duplicated DJ-Catalog2 menu item (Itemid) which URL should be assigned to. This option compares template's style ID on every page (currently browsed) with template style's IDs assigned to other menu items. When those IDs are different, the corresponding menu item will be skipped during URL creation.
- Advanced Mode (warning!) – EXPERIMENTAL! This setting removes IDs from category and product page URLs, and it requires their ALIASES to be unique among whole database. That's up to you! USE CAUTIOUSLY!
Front-end edit
Front-end product submission / management
- Edit button – it controls whether 'edit' button should be visible at product page
- Limit of products– maximum number of products that single user can submit. Enter '0' or leave empty for unlimited number
- Allowed categories – you can limit front-end submission to selected categories
- Multiple categories – choose if you want to allow front-end users to submit product to multiple categories
- Default state – decide if newly submitted product should or should not be published by default
- Default Access Level * – select the default access level for new content, menu items and other items created on your site
- Producer – should 'producer' field be hidden, required or optional
- Producer restrict – restriction means that a user will be able to choose among only those producers, that were created by him/her
- Labels – allows user to select labels
- Labels limit – maximum number of labels which can be selected
- SKU – should 'sku' field be hidden, required or optional
- Price – should 'price' field be hidden, required or optional
- Featured – manage featured field
- Available – manage 'available' field
- Field group – should 'field group' field be hidden, required or optional
- Multiple field groups – choose if you want to allow front-end users to select multiple field groups
- Intro text – manage intro description text
- Intro text editor – choose editor for intro description text
- Full text – manage full description text
- Full text editor – choose editor for full description text
- Extd Editor buttons – enables additional (extended) buttons which are available for certain editor
- Meta data – choose if you want to allow front-end users to edit meta information, like title, meta-description, neta-keywords
- Contact notifications – where should contact form queries be send to
- Max. images – enter the maximum number of images which front-end users should be allowed to upload. Enter 0 to deny uploading/managing images
- Max. image size [KB] – maximum size od single image, eg. 2048=2 MB, 0 = unlimited /limited by server
- Max. attachments – enter the maximum number of files which front-end users should be allowed to upload. Enter 0 to deny uploading/managing files
- Max. attachment size [KB] – maximum size od single file, eg. 2048=2 MB, 0 = unlimited /limited by server
- Multiple Image Upload – enable multiple image upload
- Multiple Attachment Upload – enable multiple attachments upload
- Notify on submission – notify by email when someone submits new product
- Notification emails – new-line separated list of email addresses to which notification message should be delivered. If this list is empyt, website's email address will be used
Location settings
- Location details – gives access to Location section in front-end edit view
- Country – displays country
- State – displays state
- City – displays city
- Address – displays address
- Postcode – displays postcode
- Phone no. – displays phone no.
- Mobile phone no. – displays mobile phone no.
- FAX no. – displays FAX no.
- Website address – displays website address
- Email address – displays email address
My Items layout settings
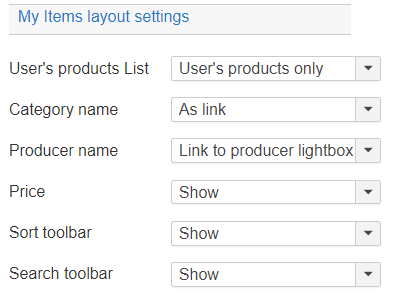
- User's products list – in 'Users Products' view the user may see only his products (default) or all products that he has access to
- Category name – displaying category name
- Producer name – displaying producer name
- Price – show price
- Sort toolbar – displays a toolbar with sort order options
- Search toolbar – displays a toolbar with a text search
Related Articles
Configuration
At the beginning, let's take a look at the DJ-Classifieds component configuration. Click the Options button from the control panel, and you will see the popup window: Short description: Global General Settings Durations - Enable this feature to ...Add videos to product in DJ-Catalog 3.8.0
The video support feature allows adding videos to DJ-Catalog2 products. Each DJ-Catalog2 product contains a “videos” tab, where users can add videos using the “upload videos” or “enter the video URL” option. There is also a third option available - ...Import configuration
Import configuration is an option that allows administrators to configure import procedures better when it comes to importing Products. The new feature can be found in the back-end area under the page named "Import configuration": Keep in mind that ...Mollie DJ-Catalog2 integration
Integrate DJ-Catalog2 with a Mollie payment processing solution and receive payments from your customers. Mollie is a pioneer in the payment industry. The company is also one of the fastest-growing payment processors within Europe. Mollie offers ...Mollie DJ-Catalog2 integration
Integrate DJ-Catalog2 with a Mollie payment processing solution and receive payments from your customers. Mollie is a pioneer in the payment industry. The company is also one of the fastest-growing payment processors within Europe. Mollie offers ...